



You can add Bitcoin to a WooCommerce store today, and you do not need to touch any code. Install a payment gateway plugin, connect a wallet, run one test order, and your checkout can take BTC alongside cards.
My honest pick for most Bitcoin focused stores is BTCPay Server. It charges no processing fee, it sends money straight to your own wallet, and it supports Lightning payments out of the box. The trade off is real, though. You run the server, or you trust a third party host to run it for you.

The Coinbase route looks simpler at first glance, but it changed under our feet. The old Coinbase Commerce plugin is no longer maintained, and Coinbase has moved merchants toward Coinbase Business. This guide covers both paths, step by step, so you can choose with your eyes open. If you want the deep server setup first, our full guide on how to set up BTCPay Server goes further into hosting choices.
- What you need before you start
- BTCPay Server vs Coinbase Business: the honest comparison
- Option 1: accept Bitcoin with BTCPay Server in 8 steps
- Step 1: back up your store and check the basics
- Step 2: get a BTCPay Server instance
- Step 3: create your account and store
- Step 4: connect your wallet
- Step 5: install the BTCPay WooCommerce plugin
- Step 6: connect WooCommerce to BTCPay
- Step 7: set your checkout rules
- Step 8: test with a real small order
- Option 2: the Coinbase Business route
- What it really costs
- Lightning, refunds, and the price moving
- Common mistakes that cost stores money
- My verdict: which one should you pick?
- Frequently Asked Questions
- Conclusion
Key takeaways
- BTCPay Server for WooCommerce is free, open source, and charges 0% in processing fees. You pay only for hosting and normal Bitcoin network fees.
- Payments go direct to your own wallet. No company holds your money, and no merchant KYC is needed for BTCPay itself.
- Do not install the old Coinbase Commerce WooCommerce plugin. It has not been tested with recent WordPress versions, and the Commerce API behind it has been deprecated in favour of Coinbase Business.
- Coinbase Business settles in USDC on Base through its WooCommerce gateway, needs a store currency of USD, and charges about 1% per transaction in current comparisons.
- Always run a small test order before you announce Bitcoin checkout to customers.
What you need before you start
Both routes need the same basics. You need a live WordPress site with WooCommerce installed, an SSL certificate so the checkout runs on HTTPS, and a Bitcoin wallet that you control. If you do not have a wallet yet, start with one of the beginner friendly options in our roundup of the best Bitcoin wallets for beginners and back up the seed phrase on paper before you receive a single sat.
The BTCPay WooCommerce plugin also has server side needs. The official requirements list PHP 8.0 or newer, the cURL, gd, intl, json, and mbstring PHP extensions, and a BTCPay Server version of 1.3.0 or later. Most decent WordPress hosts already meet the PHP side. Ask your host if you are not sure, because a missing extension is the most boring reason a setup fails.
Self hosted or third party BTCPay?
Self hosting gives you the full promise of BTCPay. Your server, your node, your rules, and nobody can freeze your checkout. It also means updates, backups, and uptime are your problem. A small VPS is enough for most stores, and guides in this space usually put hosting at roughly $10 to $30 per month.
A third party BTCPay host is the faster start. You sign up, create a store, and connect WooCommerce the same afternoon. You give up some privacy and some features, and you depend on that host staying online. Plenty of small stores start there and move to their own server later, once orders justify the effort.

BTCPay Server vs Coinbase Business: the honest comparison
These two options solve the same problem in opposite ways. BTCPay is software you control. Coinbase Business is a service a big company controls. Neither answer is right for everyone, and anyone who tells you otherwise is selling something.
Store owners who came from Shopify often ask how this differs, and the short version is that WooCommerce gives you more control and more responsibility. We covered the hosted platform route in our guide on accepting Bitcoin payments on Shopify, and the contrast is useful before you commit.
| Feature | BTCPay Server | Coinbase Business gateway |
|---|---|---|
| Processing fee | 0%. You pay hosting and network fees only | About 1% per transaction |
| Who holds the money | You do. Payments land in your own wallet | Coinbase does, inside your business account |
| What customers pay with | Bitcoin on chain and Lightning by default | USDC on Base in the current WooCommerce gateway |
| Merchant KYC | None for the software itself | Yes, a Coinbase Business account is required |
| Setup effort | Higher. Server, store, wallet, then the plugin | Lower. Account, API key, webhook, done |
| Best for | Bitcoin focused stores that want no fees and full control | Stores that mainly want simple USDC settlement |
The Coinbase warning most guides skip
Search results still push the old Coinbase Commerce plugin, and that worries me. Its WordPress page says it has not been tested with the last three major WordPress versions, and user reviews complain about orders not updating after payment. The newer gateway plugin states plainly that the Commerce API has been deprecated and merchants have migrated to Coinbase Business. Installing the old plugin in 2026 is building your checkout on a dead end.
Option 1: accept Bitcoin with BTCPay Server in 8 steps
This is the route I recommend for a store that actually wants Bitcoin, not just a crypto badge at checkout. Take it slowly. Each step is simple on its own, and most problems come from rushing the wallet step.
The official BTCPay walkthrough video below shows the WooCommerce connection process on screen, and it is worth watching once before you start clicking.
Step 1: back up your store and check the basics
Take a full backup of your WordPress site first. Then confirm your checkout loads on HTTPS and your PHP version is 8.0 or higher under WooCommerce, Status. Five minutes here can save you a very bad evening.
Step 2: get a BTCPay Server instance
Deploy your own instance on a VPS, use a one click host, or register on a reputable third party instance. If you already run your own node, you will feel at home, and our guide on running a Bitcoin node at home explains why pairing BTCPay with your own node gives you the strongest setup. Wait for the node to sync fully before you move on.
Step 3: create your account and store
Register on your BTCPay instance, then create a store with your shop name and your store currency. The store currency is the fiat price your products are listed in. BTCPay converts it to BTC at the live rate when a customer pays.
Step 4: connect your wallet
In your BTCPay store settings, connect the wallet that will receive payments. You can paste an extended public key from a hardware wallet, connect a device directly, or create a wallet inside BTCPay. A hardware wallet is the safer choice for real revenue. Desktop tools like Sparrow Wallet make it easy to watch the same wallet and confirm that test payments really arrived.
Write the seed phrase on paper and store it offline. Never type it into a website, and never store it in cloud notes. If that phrase leaks, your store revenue can be emptied in minutes.
Step 5: install the BTCPay WooCommerce plugin
In WordPress, go to Plugins, Add New, and search for BTCPay Server. Install the plugin called BTCPay Server, Accept Bitcoin payments in WooCommerce, then activate it. This is the current V2 plugin built on the Greenfield API, not the old legacy plugin.
Step 6: connect WooCommerce to BTCPay
Go to WooCommerce, Settings, Payments, and open the BTCPay gateway. Enter your BTCPay URL and use the API key wizard, which is the recommended path. It sends you to your BTCPay instance, you pick the store, you approve the app, and you land back in WordPress with the API key, store ID, and webhook secret filled in for you.
The manual path also works. Create an API key inside BTCPay with permissions for your store, copy the store ID, and create the webhook by hand. If order statuses stop updating later, the webhook is the first place to look.
Step 7: set your checkout rules
Decide how many confirmations an order needs before it counts as paid. One confirmation is a sensible default for normal value goods, and zero confirmation is risky for anything you ship. Set an invoice expiry that gives customers enough time, often 15 to 60 minutes, and turn on Lightning if your instance supports it. Lightning makes small orders painless, because the fee is tiny and the payment lands in seconds.
Step 8: test with a real small order
Place a test order on your own store and pay it from a separate wallet, exactly like a customer would. Check that the order status updates on its own, the confirmation email arrives, and the money shows in your wallet. You can follow the payment yourself with the steps in our guide on how to track a Bitcoin transaction. Only after that full loop works should you tell customers the option exists.
Option 2: the Coinbase Business route
Maybe you read the BTCPay steps and thought, honestly, no. That is a fair reaction. Running a server is not for everyone, and a custodial service trades control for convenience. Just go in knowing what the current product actually is.
The path today starts with a Coinbase Business account, which means identity checks for your company and a wait for approval. After that, install the Coinbase Business Gateway plugin for WooCommerce, enable it under WooCommerce, Settings, Payments, then create a CDP API key inside Coinbase and paste the key name and private key into the plugin. Copy the webhook URL from the plugin settings into Coinbase, save the webhook secret back in the plugin, and make sure your store currency is set to USD, which the gateway requires.
What you give up on this route
Two things stand out to me. First, the current WooCommerce gateway lists support for USDC on Base, so a customer who wants to pay in actual BTC is not really the target here. Second, your money sits with Coinbase until you move it, and your account can be reviewed or frozen under its terms. For a store that just wants stablecoin settlement with minimal fuss, that trade can still make sense. For a Bitcoin store, it misses the point.
What it really costs
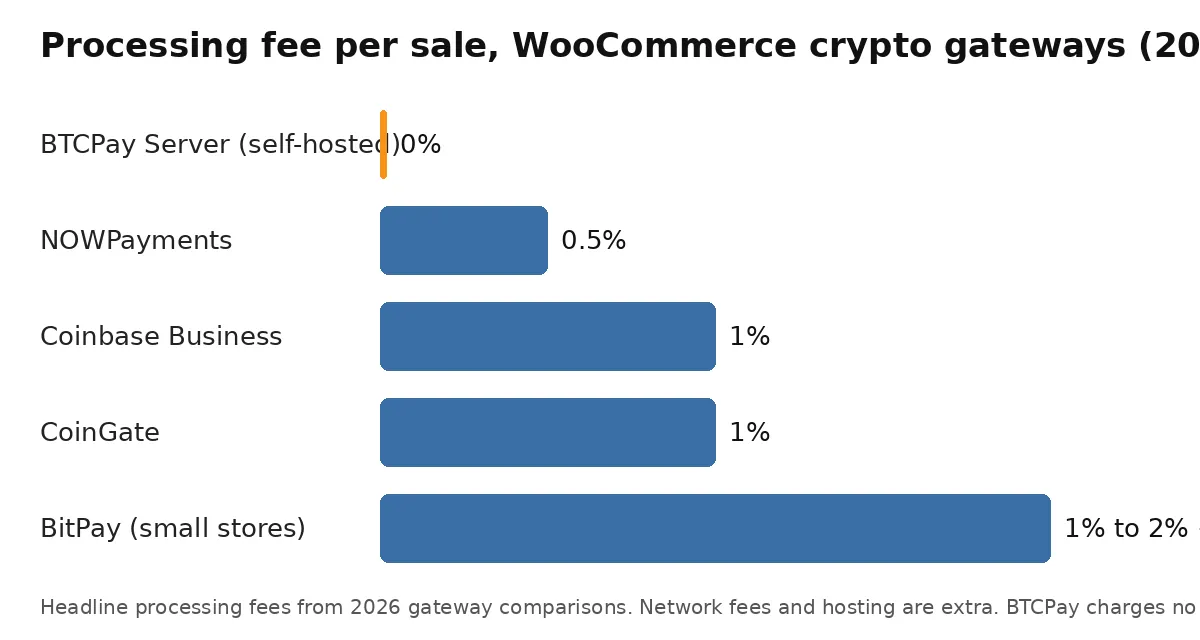
Fees are where BTCPay wins in a way that is hard to argue with. On a $100 sale, a 1% gateway keeps $1 and a 2% tier keeps $2, before the extra per transaction charge some plans add. BTCPay keeps $0 in processing fees. Your real costs are the VPS or host, plus the normal Bitcoin network fee when you later move or consolidate funds.
That math flips at tiny volumes, and I will say so plainly. If you take two Bitcoin orders a month, a $15 VPS costs more than the fees you saved. Start on a third party BTCPay host or a custodial gateway, then self host when order volume makes the saving obvious.
Lightning, refunds, and the price moving
Bitcoin payments come with three practical questions, and you should decide your answers before the first order, not during it. Lightning is the easy one. Enable it if you can, because it turns checkout into a quick QR scan for small baskets, and a good Bitcoin Lightning wallet on the customer side makes the whole thing feel normal.
Refunds need a policy. Bitcoin payments cannot be reversed like card payments, so refunds are new payments that you send back, usually at the exchange rate on the day you refund. Write that down in your store terms. The same goes for price swings. If you want to keep BTC, the swing is part of the deal. If you cannot afford it, convert sales to fiat or stablecoins often, and keep clean records of the rate on each order for your tax filings.
Order status problems and how to spot them
The classic fault is a paid invoice with an order stuck on pending. Nine times out of ten that is the webhook. Check that the webhook exists in BTCPay, that the secret matches the plugin, and that your site did not block the callback during maintenance mode. Test again after any fix, with the smallest order you can make.
Common mistakes that cost stores money
The saddest mistake is receiving store revenue into a wallet whose seed phrase lives in a screenshot. The second saddest is shipping on zero confirmations for a high value order, then watching the payment never confirm. Both happen every year, and both are easy to prevent.
Other regular errors include testing only with the store owner account, which hides guest checkout problems, setting an invoice expiry so short that slow wallets time out, and forgetting that a price drop between checkout and refund creates an angry customer unless your policy already covers it. Also, please, do a real test order after every big WooCommerce or plugin update. Checkout breaks quietly.
My verdict: which one should you pick?
If your store sells to Bitcoin users, pick BTCPay Server. Start on a third party host if the server work scares you, connect your own hardware wallet, and move to your own VPS when volume grows. You keep the full sale amount, you hold your own keys, and nobody can switch your checkout off.
If your store just wants to tick a crypto box for occasional buyers, and USDC settlement is fine, the Coinbase Business gateway is less work to run. Just skip the abandoned Commerce plugin, budget the 1% fee, and accept that the funds and the account are under Coinbase control. Either way, the worst option is doing nothing while your competitors quietly add the payment method your customers keep asking for.
Frequently Asked Questions
Does WooCommerce accept Bitcoin payments by default?
No. WooCommerce does not take Bitcoin on its own. You need a payment gateway plugin such as BTCPay Server or the Coinbase Business gateway, plus a wallet or business account for the money to land in.
How much does it cost to accept Bitcoin on WooCommerce?
With BTCPay Server the processing fee is 0%, and you pay only for hosting and Bitcoin network fees. Custodial gateways charge a percentage per sale, with Coinbase Business at about 1% and BitPay between 1% and 2% plus $0.25 in current comparisons.
Is the old Coinbase Commerce WooCommerce plugin still safe to use?
It is not a good idea in 2026. The plugin has not been tested with the last three major WordPress versions, and the Commerce API behind it has been deprecated in favour of Coinbase Business, which is where Coinbase now directs WooCommerce merchants.
How long does a Bitcoin checkout take to confirm?
A Lightning payment confirms in seconds. An on chain payment is usually marked paid after the number of confirmations you set in the gateway, and one confirmation often takes about 10 minutes, though busy network periods can make it longer.
Do I need KYC to accept Bitcoin in my store?
Not with BTCPay Server, because the software is self hosted and payments go straight to your wallet. Custodial services such as Coinbase Business and BitPay do require a verified merchant account before you can receive settlements.
Conclusion
Adding Bitcoin to WooCommerce is an afternoon of careful work, not a development project. Pick BTCPay if you want zero processing fees and full control, pick Coinbase Business if you want simple USDC settlement and accept the trade offs, and test the full order flow before you promote it. Your first real BTC order will feel like a small event. That is normal. Then it just becomes another way customers pay you.